

OpenPose represents the first real-time multi-person system to jointly detect human body, hand, facial, and foot key points (in total 135 keypoints) on single images.
But the problem is we have to build and install the Openpose from its source which is not like installing python package using PIP or CONDA
System configuration used
- Ubuntu 18.04
- Python 3.6
- Nvidia GTX 1660 Ti
Follow the instruction to install openpose python api for your python project :
1) Recommendation: Use the virtual environment for python project. In my case, I am using virtual environment using pip ( https://help.dreamhost.com/hc/en-us/articles/115000695551-Installing-and-using-virtualenv-with-Python-3 ) After activating your virtualenv your terminal command looks like this
my case I am using “gan“ as the virtual env name

2) Clone the source repo of Openpose from their github
1
$ git clone https://github.com/CMU-Perceptual-Computing-Lab/openpose
3) For Openpose there are some dependencies to be installed like CMake GUI , Nvidia Drivers , Caffe , Opencv .
Warning : Anaconda should not be installed on your system. Anaconda includes a Protobuf version that is incompatible with Caffe. Either you uninstall anaconda and install protobuf via apt-get, or you compile your own Caffe and link it to OpenPose.
4) CMake GUI Installation : Uninstall your current Cmake-gui version by running
1
  $ sudo apt purge cmake-qt-gui
Run
1
  $ sudo apt-get install qtbase5-dev
Download the Latest Release of CMake Unix/Linux Source from the_ CMake download website, called cmake-X.X.X.tar.gz Unzip it and go inside that folder from the terminal. Run
1
2
  $ ./configure — qt-gui
  $ ./bootstrap && sudo make -j8 && sudo make install -j8
After this step , CMake application will be available in the ubuntu menu bar like this :

5) Nvidia-Drivers: OpenPose has been tested extensively with CUDA 8.0 (cuDNN 5.1) and CUDA 10.0 (cuDNN 7.5) .
Note : If you installed nvidia drivers beforehand or using CPU_ skip this step else follow the below instruction
CUDA:
- Ubuntu 18 (CUDA 10): Download the latest Nvidia CUDA version from their official website.
- Select “Linux” -> “x86_64” -> “Ubuntu” -> “18.04” -> “runfile (local)”, and download it.
- Follow the Nvidia website installation instructions. Make sure to enable the symbolic link in usr/local/cuda to minimize potential future errors.
cuDNN:
- Ubuntu 18 (cuDNN 7.2): Download and install it from the Nvidia website.
- Install Caffe, OpenCV, and Caffe prerequisites:
After successful installation of CUDA and cuDNN proceed with these commands
1
2
  $ cd openpose
  $ sudo bash ./scripts/ubuntu/install_deps.sh
6) Since you made a fresh install of caffe you have to build it from source for Openpose
1
2
  $ cd openpose/3rdparty
  $ git clone https://github.com/CMU-Perceptual-Computing-Lab/caffe.git
7) Now create an empty subcategory “build” folder inside Openpose folder :
1
2
  $ cd openpose
  $ mkdir build

8) Open CMake GUI , select Openpose source code directory path and build directory path

9) Select Configure to compile the files. A dialog box appears CMakeSetup .Select the following and click finish.

10) It takes some time to download models and compiling it. If any error happens it may be of CUDA or cuDNN installation. After successful configuration, it looks like this also check the “BUILD_PYTHON” inside the red box

11) Now click “Generate” . It will be like this after the successful generation

12) Close the CMake and proceed with commands in your virtual env enabled terminal. To build the openpose
1
2
  $ cd openpose/build/
  $ make -j`nproc`
13) Compile the Openpose source
1
2
  $ cd openpose/build/
  $ sudo make install
14) Compile and build the python Openpose :
1
2
  $ cd openpose/build/python/openpose
  $ sudo make install
Thats it . To check the build successful completed and its usable follow the below command
1
$ cd openpose/build/examples/tutorial_api_python
if you used python3+ for your virtual env,
1
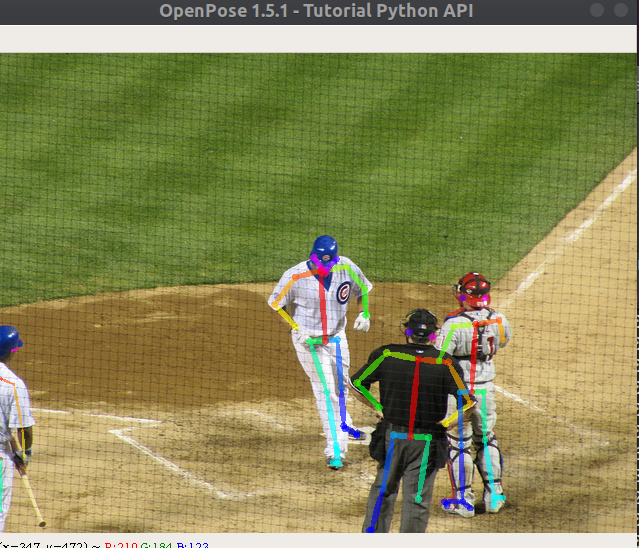
$ python 01_body_from_image.py
You will see an output like this.
To use Openpose API in your python script use the import of Openpose like the below
1
2
3
import sys
sys.path.append('/usr/local/python')
from  openpose  import pyopenpose as op
Now you can try all the functions of Openpose as needed. Feel free to share your reviews and queries.
Reference
- https://github.com/CMU-Perceptual-Computing-Lab/openpose/blob/d89fe626505cde6604396aed77ad283c8f013473/doc/installation.md#requirements-and-dependencies
- https://github.com/CMU-Perceptual-Computing-Lab/openpose/blob/master/doc/modules/python_module.md
- https://github.com/CMU-Perceptual-Computing-Lab/openpose/blob/master/examples/tutorial_api_python/04_keypoints_from_images.py
- https://github.com/CMU-Perceptual-Computing-Lab/openpose/issues/423
- https://github.com/CMU-Perceptual-Computing-Lab/openpose/blob/master/doc/prerequisites.md
- https://github.com/CMU-Perceptual-Computing-Lab/openpose/issues/1027
Comments powered by Disqus.